こんにちは id:dhigashi です。
7/27 に開催された Innovation Summit Tokyo 2018 で Fn Project: 今最も注目すべき「サーバレス」クラウドアプリケーション開発基盤 というタイトルで Fn Project についてのセッションがありました。
面白そうでしたので、今回は Oracle Cloud ではなく Fn Project について簡単に触ってみたいと思います。
セッション資料はこちらから見る事ができます。
http://www.oracle.co.jp/campaign/innovation/2018/pdfs/ist18_b-3.pdf
尚、Fn Project は Oracle Cloud 上で提供される FaaS の Oracle Functions として利用できるようになるようです。
Fn Project
インストールの前に
事前条件として以下を満たす必要があります。
- Docker 17.10.0-ce 以上がインストールされていること
- Docker Hub のアカウントを持ち、ログイン済みであること
尚、検証に使用した環境は以下の通りです。
$ cat /etc/lsb-release
DISTRIB_ID=Ubuntu
DISTRIB_RELEASE=16.04
DISTRIB_CODENAME=xenial
DISTRIB_DESCRIPTION="Ubuntu 16.04.5 LTS"
$ docker version
Client:
Version:           18.06.0-ce
API version:       1.38
Go version:        go1.10.3
Git commit:        0ffa825
Built:             Wed Jul 18 19:11:02 2018
OS/Arch:           linux/amd64
Experimental:      false
Server:
Engine:
Version:          18.06.0-ce
API version:      1.38 (minimum version 1.12)
Go version:       go1.10.3
Git commit:       0ffa825
Built:            Wed Jul 18 19:09:05 2018
OS/Arch:          linux/amd64
Experimental:     false
インストール
fnproject/fn - quickstart に従いインストールします。
$ curl -LSs https://raw.githubusercontent.com/fnproject/cli/master/install | sh
fn version 0.4.140
______
/ ____/___
/ /_  / __ \
/ __/ / / / /
/_/   /_/ /_/`
インストールが完了したら Fn サーバを起動します。
$ fn start
Unable to find image 'fnproject/fnserver:latest' locally
latest: Pulling from fnproject/fnserver
略
______
/ ____/___
/ /_  / __ \
/ __/ / / / /
/_/   /_/ /_/
v0.3.520
起動できたらバージョンを確認してみます。
$ fn version
Client version is latest version: 0.4.140
Server version:  0.3.520
尚、Fn サーバは Dockerコンテナとして起動しています。
$ docker ps
CONTAINER ID        IMAGE                COMMAND             CREATED             STATUS              PORTS                              NAMES
7156fd345aa1        fnproject/fnserver   "./fnserver"        2 hours ago         Up 2 hours          2375/tcp, 0.0.0.0:8080->8080/tcp   fnserver
最後に、環境変数 FN_REGISTRY に自身の Docker Hub のユーザ名を設定し準備は完了です。
export FN_REGISTRY=my_dockerhub_username
関数の作成
fn init コマンドで新しい関数を作成します。
$ fn init --help
DEVELOPMENT COMMANDS
fn init -   Create a local func.yaml file
USAGE
fn [global options] init [command options] [function-subdirectory]
DESCRIPTION
This command creates a func.yaml file in the current directory.
COMMAND OPTIONS
--name value                   Name of the function. Defaults to directory name in lowercase.
--force                        Overwrite existing func.yaml
--runtime value                Choose an existing runtime - dotnet, go, java8, java9, java, lambda-nodejs4.3, lambda-node-4, node, php, python, python3.6, ruby, rust, kotlin
--entrypoint value             Entrypoint is the command to run to start this function - equivalent to Dockerfile ENTRYPOINT.
--cmd value                    Command to run to start this function - equivalent to Dockerfile CMD.
--version value                Set initial function version (default: "0.0.1")
--working-dir value, -w value  Specify the working directory to initialise a function, must be the full path.
--trigger value                Specify the trigger type.
--memory value, -m value       Memory in MiB (default: 0)
--type value, -t value         Route type - sync or async
--config value, -c value       Route configuration
--headers value                Route response headers
--format value, -f value       Hot container IO format - default or http
--timeout value                Route timeout (eg. 30) (default: 0)
--idle-timeout value           Route idle timeout (eg. 30) (default: 0)
--annotation value             Route annotation (can be specified multiple times)
$ fn init --runtime go hello
Creating function at: /hello
Runtime: go
Function boilerplate generated.
func.yaml created.
今回はランタイムに go 言語を選択しましたが、ヘルプを見ると現時点では dotnet、java、node、python、ruby...などの言語が選択できるようです。
特に rust、kotlin は珍しい気がします。
function-subdirectory として指定した hello ディレクトリ以下にファイルが作成されました。
$ cd hello
$ ls -1
Gopkg.toml
func.go
func.yaml
test.json
func.go は以下のような内容になっています。
$ cat func.go package main import ( "context" "encoding/json" "fmt" "io" fdk "github.com/fnproject/fdk-go" ) func main() { fdk.Handle(fdk.HandlerFunc(myHandler)) } type Person struct { Name stringjson:"name"} func myHandler(ctx context.Context, in io.Reader, out io.Writer) { p := &Person{Name: "World"} json.NewDecoder(in).Decode(p) msg := struct { Msg stringjson:"message"}{ Msg: fmt.Sprintf("Hello %s", p.Name), } json.NewEncoder(out).Encode(&msg) }
myHandler 関数をみると in から入力し out へ出力するだけのシンプルなものです。
入力は json を期待しているようです。
次に func.yaml を見てみます。
$ cat func.yaml
name: hello
version: 0.0.1
runtime: go
entrypoint: ./func
format: json
関数の名前やバージョン、ランタイム、実行ファイル名などが記されています。
ここに format として json が指定されており、関数の入出力に json を用いる事を示しています。
ローカルで関数の実行
fn init コマンドによって作成された関数をローカルで実行してみます。
ローカルで実行するには fn run コマンドを使用します。
$ fn run
Building image my_dockerhub_username/hello:0.0.1 ............................
{"message":"Hello World"}
入力に何も指定していないので、出力された message の値が Hello World となっています。
次に標準入力で値を渡して実行してみます。
$ echo -n '{"name":"Jason"}' | fn run
Building image my_dockerhub_username/hello:0.0.1 ...
{"message":"Hello Jason"}
標準入力で与えられた値によって出力を変える事ができました。
関数のデプロイ
ローカルで動作を確認した関数を Fn サーバへデプロイします。
デプロイを行うためには fn deploy コマンドを使用します。
$ fn deploy --help
DEVELOPMENT COMMANDS
fn deploy -   Deploys a function to the functions server (bumps, build, pushes and updates route).
USAGE
fn [global options] deploy [command options] [function-subdirectory]
DESCRIPTION
This command deploys one or all (--all) functions to the function server.
COMMAND OPTIONS
--app value                     App name to deploy to
--verbose, -v                   Verbose mode
--no-cache                      Don't use Docker cache for the build
  --local, --skip-push            Do not push Docker built images onto Docker Hub - useful for local development.
  --registry --registry username  Set the Docker owner for images and optionally the registry. This will be prefixed to your function name for pushing to Docker registries  eg: --registry username will set your Docker Hub owner. --registry registry.hub.docker.com/username will set the registry and owner.
  --all app.yaml                  If in root directory containing app.yaml, this will deploy all functions
  --no-bump                       Do not bump the version, assuming external version management
  --build-arg value               Set build time variables
  --working-dir value, -w value   Specify the working directory to deploy a function, must be the full path.
$ fn deploy --app myapp --local
Deploying hello to app: myapp at path: /hello
Bumped to version 0.0.2
Building image my_dockerhub_username/hello:0.0.2 ...
Updating route /hello using image my_dockerhub_username/hello:0.0.2...
アプリケーション名に myapp と指定しデプロイを行います。
※ 今回 Docker Hub へのプッシュを行わないため、--local オプションを指定しています。
アプリケーションの一覧を取得すると myapp が存在する事が確認できます。
$ fn list apps
NAME
myapp
また myapp のルーティングを確認すると、先程デプロイした /hello が存在する事が確認できます。
$ fn list routes myapp
PATH    IMAGE                   ENDPOINT
/hello  my_dockerhub_username/hello:0.0.2     localhost:8080/r/myapp/hello
デプロイした関数の実行
Fn サーバへデプロイした関数を実行してみます。
関数の呼び出しには fn call コマンドを使用します。
ローカルで実行した時と同じように、デプロイした関数を実行できます。
$ fn call myapp /hello
{"message":"Hello World"}
$ echo -n '{"name":"Jason"}' | fn call myapp /hello
{"message":"Hello Jason"}
また、デプロイした関数は HTTP 経由でも実行する事ができます。
$ curl -H "Content-Type: application/json" http://localhost:8080/r/myapp/hello
{"message":"Hello World"}
$ curl -H "Content-Type: application/json" -d '{"name": "Jason"}' http://localhost:8080/r/myapp/hello
{"message":"Hello Jason"}
ダッシュボード(おまけ)
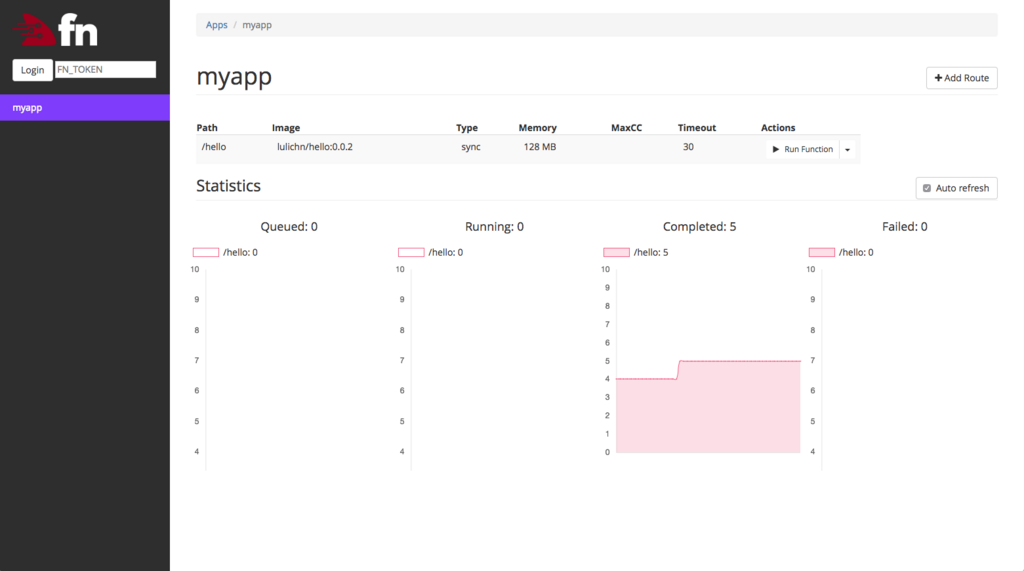
Fn Project には UI が用意されており、ダッシュボードで関数のメトリクスを参照する事ができます。

先程デプロイした関数とそのルーティングや、呼び出された数などを確認する事ができました。
まとめ
今回は チュートリアル に沿ってFn Project を簡単に触ってみました。
Fn Project には Fn Flow という機能があり、セッション資料では以下のように説明されています。
Fork-join/連鎖/遅延/エラーハンドリングなどの要素を含む高信頼、スケーラブルな長期に渡る実行が可能なfunction
次はこちらを使用してより実用的なアプリケーションを作成してみたいと思います。

